LnRiLWdyaWQsLnRiLWdyaWQ+LmJsb2NrLWVkaXRvci1pbm5lci1ibG9ja3M+LmJsb2NrLWVkaXRvci1ibG9jay1saXN0X19sYXlvdXR7ZGlzcGxheTpncmlkO2dyaWQtcm93LWdhcDoyNXB4O2dyaWQtY29sdW1uLWdhcDoyNXB4fS50Yi1ncmlkLWl0ZW17YmFja2dyb3VuZDojZDM4YTAzO3BhZGRpbmc6MzBweH0udGItZ3JpZC1jb2x1bW57ZmxleC13cmFwOndyYXB9LnRiLWdyaWQtY29sdW1uPip7d2lkdGg6MTAwJX0udGItZ3JpZC1jb2x1bW4udGItZ3JpZC1hbGlnbi10b3B7d2lkdGg6MTAwJTtkaXNwbGF5OmZsZXg7YWxpZ24tY29udGVudDpmbGV4LXN0YXJ0fS50Yi1ncmlkLWNvbHVtbi50Yi1ncmlkLWFsaWduLWNlbnRlcnt3aWR0aDoxMDAlO2Rpc3BsYXk6ZmxleDthbGlnbi1jb250ZW50OmNlbnRlcn0udGItZ3JpZC1jb2x1bW4udGItZ3JpZC1hbGlnbi1ib3R0b217d2lkdGg6MTAwJTtkaXNwbGF5OmZsZXg7YWxpZ24tY29udGVudDpmbGV4LWVuZH0gLndwdi12aWV3LW91dHB1dFtkYXRhLXRvb2xzZXQtdmlld3Mtdmlldy1lZGl0b3I9IjhlOTkyNjFmMzMxODc0NzRjZmY5OTI2OTcxYzYyZjY1Il0gPiAudGItZ3JpZC1jb2x1bW46bnRoLW9mLXR5cGUoM24gKyAxKSB7IGdyaWQtY29sdW1uOiAxIH0gLndwdi12aWV3LW91dHB1dFtkYXRhLXRvb2xzZXQtdmlld3Mtdmlldy1lZGl0b3I9IjhlOTkyNjFmMzMxODc0NzRjZmY5OTI2OTcxYzYyZjY1Il0gPiAudGItZ3JpZC1jb2x1bW46bnRoLW9mLXR5cGUoM24gKyAyKSB7IGdyaWQtY29sdW1uOiAyIH0gLndwdi12aWV3LW91dHB1dFtkYXRhLXRvb2xzZXQtdmlld3Mtdmlldy1lZGl0b3I9IjhlOTkyNjFmMzMxODc0NzRjZmY5OTI2OTcxYzYyZjY1Il0gPiAudGItZ3JpZC1jb2x1bW46bnRoLW9mLXR5cGUoM24gKyAzKSB7IGdyaWQtY29sdW1uOiAzIH0gLndwdi12aWV3LW91dHB1dFtkYXRhLXRvb2xzZXQtdmlld3Mtdmlldy1lZGl0b3I9IjhlOTkyNjFmMzMxODc0NzRjZmY5OTI2OTcxYzYyZjY1Il0gLmpzLXdwdi1sb29wLXdyYXBwZXIgPiAudGItZ3JpZCB7IGdyaWQtdGVtcGxhdGUtY29sdW1uczogbWlubWF4KDAsIDAuMzMzM2ZyKSBtaW5tYXgoMCwgMC4zMzMzZnIpIG1pbm1heCgwLCAwLjMzMzNmcik7Z3JpZC1hdXRvLWZsb3c6IHJvdyB9IC50Yi1pbWFnZXtwb3NpdGlvbjpyZWxhdGl2ZTt0cmFuc2l0aW9uOnRyYW5zZm9ybSAwLjI1cyBlYXNlfS53cC1ibG9jay1pbWFnZSAudGItaW1hZ2UuYWxpZ25jZW50ZXJ7bWFyZ2luLWxlZnQ6YXV0bzttYXJnaW4tcmlnaHQ6YXV0b30udGItaW1hZ2UgaW1ne21heC13aWR0aDoxMDAlO2hlaWdodDphdXRvO3dpZHRoOmF1dG87dHJhbnNpdGlvbjp0cmFuc2Zvcm0gMC4yNXMgZWFzZX0udGItaW1hZ2UgLnRiLWltYWdlLWNhcHRpb24tZml0LXRvLWltYWdle2Rpc3BsYXk6dGFibGV9LnRiLWltYWdlIC50Yi1pbWFnZS1jYXB0aW9uLWZpdC10by1pbWFnZSAudGItaW1hZ2UtY2FwdGlvbntkaXNwbGF5OnRhYmxlLWNhcHRpb247Y2FwdGlvbi1zaWRlOmJvdHRvbX0gLndwLWJsb2NrLWltYWdlLnRiLWltYWdlW2RhdGEtdG9vbHNldC1ibG9ja3MtaW1hZ2U9IjZlYzc3NjZiMjlhM2UyMTNmZTcyMzJhZDcwNmVmNTA3Il0geyBtYXgtd2lkdGg6IDEwMCU7IH0gQG1lZGlhIG9ubHkgc2NyZWVuIGFuZCAobWF4LXdpZHRoOiA3ODFweCkgeyAudGItZ3JpZCwudGItZ3JpZD4uYmxvY2stZWRpdG9yLWlubmVyLWJsb2Nrcz4uYmxvY2stZWRpdG9yLWJsb2NrLWxpc3RfX2xheW91dHtkaXNwbGF5OmdyaWQ7Z3JpZC1yb3ctZ2FwOjI1cHg7Z3JpZC1jb2x1bW4tZ2FwOjI1cHh9LnRiLWdyaWQtaXRlbXtiYWNrZ3JvdW5kOiNkMzhhMDM7cGFkZGluZzozMHB4fS50Yi1ncmlkLWNvbHVtbntmbGV4LXdyYXA6d3JhcH0udGItZ3JpZC1jb2x1bW4+Knt3aWR0aDoxMDAlfS50Yi1ncmlkLWNvbHVtbi50Yi1ncmlkLWFsaWduLXRvcHt3aWR0aDoxMDAlO2Rpc3BsYXk6ZmxleDthbGlnbi1jb250ZW50OmZsZXgtc3RhcnR9LnRiLWdyaWQtY29sdW1uLnRiLWdyaWQtYWxpZ24tY2VudGVye3dpZHRoOjEwMCU7ZGlzcGxheTpmbGV4O2FsaWduLWNvbnRlbnQ6Y2VudGVyfS50Yi1ncmlkLWNvbHVtbi50Yi1ncmlkLWFsaWduLWJvdHRvbXt3aWR0aDoxMDAlO2Rpc3BsYXk6ZmxleDthbGlnbi1jb250ZW50OmZsZXgtZW5kfSAud3B2LXZpZXctb3V0cHV0W2RhdGEtdG9vbHNldC12aWV3cy12aWV3LWVkaXRvcj0iOGU5OTI2MWYzMzE4NzQ3NGNmZjk5MjY5NzFjNjJmNjUiXSA+IC50Yi1ncmlkLWNvbHVtbjpudGgtb2YtdHlwZSgzbiArIDEpIHsgZ3JpZC1jb2x1bW46IDEgfSAud3B2LXZpZXctb3V0cHV0W2RhdGEtdG9vbHNldC12aWV3cy12aWV3LWVkaXRvcj0iOGU5OTI2MWYzMzE4NzQ3NGNmZjk5MjY5NzFjNjJmNjUiXSA+IC50Yi1ncmlkLWNvbHVtbjpudGgtb2YtdHlwZSgzbiArIDIpIHsgZ3JpZC1jb2x1bW46IDIgfSAud3B2LXZpZXctb3V0cHV0W2RhdGEtdG9vbHNldC12aWV3cy12aWV3LWVkaXRvcj0iOGU5OTI2MWYzMzE4NzQ3NGNmZjk5MjY5NzFjNjJmNjUiXSA+IC50Yi1ncmlkLWNvbHVtbjpudGgtb2YtdHlwZSgzbiArIDMpIHsgZ3JpZC1jb2x1bW46IDMgfSAud3B2LXZpZXctb3V0cHV0W2RhdGEtdG9vbHNldC12aWV3cy12aWV3LWVkaXRvcj0iOGU5OTI2MWYzMzE4NzQ3NGNmZjk5MjY5NzFjNjJmNjUiXSAuanMtd3B2LWxvb3Atd3JhcHBlciA+IC50Yi1ncmlkIHsgZ3JpZC10ZW1wbGF0ZS1jb2x1bW5zOiBtaW5tYXgoMCwgMC4zMzMzZnIpIG1pbm1heCgwLCAwLjMzMzNmcikgbWlubWF4KDAsIDAuMzMzM2ZyKTtncmlkLWF1dG8tZmxvdzogcm93IH0gLnRiLWltYWdle3Bvc2l0aW9uOnJlbGF0aXZlO3RyYW5zaXRpb246dHJhbnNmb3JtIDAuMjVzIGVhc2V9LndwLWJsb2NrLWltYWdlIC50Yi1pbWFnZS5hbGlnbmNlbnRlcnttYXJnaW4tbGVmdDphdXRvO21hcmdpbi1yaWdodDphdXRvfS50Yi1pbWFnZSBpbWd7bWF4LXdpZHRoOjEwMCU7aGVpZ2h0OmF1dG87d2lkdGg6YXV0bzt0cmFuc2l0aW9uOnRyYW5zZm9ybSAwLjI1cyBlYXNlfS50Yi1pbWFnZSAudGItaW1hZ2UtY2FwdGlvbi1maXQtdG8taW1hZ2V7ZGlzcGxheTp0YWJsZX0udGItaW1hZ2UgLnRiLWltYWdlLWNhcHRpb24tZml0LXRvLWltYWdlIC50Yi1pbWFnZS1jYXB0aW9ue2Rpc3BsYXk6dGFibGUtY2FwdGlvbjtjYXB0aW9uLXNpZGU6Ym90dG9tfSB9IEBtZWRpYSBvbmx5IHNjcmVlbiBhbmQgKG1heC13aWR0aDogNTk5cHgpIHsgLnRiLWdyaWQsLnRiLWdyaWQ+LmJsb2NrLWVkaXRvci1pbm5lci1ibG9ja3M+LmJsb2NrLWVkaXRvci1ibG9jay1saXN0X19sYXlvdXR7ZGlzcGxheTpncmlkO2dyaWQtcm93LWdhcDoyNXB4O2dyaWQtY29sdW1uLWdhcDoyNXB4fS50Yi1ncmlkLWl0ZW17YmFja2dyb3VuZDojZDM4YTAzO3BhZGRpbmc6MzBweH0udGItZ3JpZC1jb2x1bW57ZmxleC13cmFwOndyYXB9LnRiLWdyaWQtY29sdW1uPip7d2lkdGg6MTAwJX0udGItZ3JpZC1jb2x1bW4udGItZ3JpZC1hbGlnbi10b3B7d2lkdGg6MTAwJTtkaXNwbGF5OmZsZXg7YWxpZ24tY29udGVudDpmbGV4LXN0YXJ0fS50Yi1ncmlkLWNvbHVtbi50Yi1ncmlkLWFsaWduLWNlbnRlcnt3aWR0aDoxMDAlO2Rpc3BsYXk6ZmxleDthbGlnbi1jb250ZW50OmNlbnRlcn0udGItZ3JpZC1jb2x1bW4udGItZ3JpZC1hbGlnbi1ib3R0b217d2lkdGg6MTAwJTtkaXNwbGF5OmZsZXg7YWxpZ24tY29udGVudDpmbGV4LWVuZH0gLndwdi12aWV3LW91dHB1dFtkYXRhLXRvb2xzZXQtdmlld3Mtdmlldy1lZGl0b3I9IjhlOTkyNjFmMzMxODc0NzRjZmY5OTI2OTcxYzYyZjY1Il0gID4gLnRiLWdyaWQtY29sdW1uOm50aC1vZi10eXBlKDFuKzEpIHsgZ3JpZC1jb2x1bW46IDEgfSAud3B2LXZpZXctb3V0cHV0W2RhdGEtdG9vbHNldC12aWV3cy12aWV3LWVkaXRvcj0iOGU5OTI2MWYzMzE4NzQ3NGNmZjk5MjY5NzFjNjJmNjUiXSAuanMtd3B2LWxvb3Atd3JhcHBlciA+IC50Yi1ncmlkIHsgZ3JpZC10ZW1wbGF0ZS1jb2x1bW5zOiBtaW5tYXgoMCwgMWZyKTtncmlkLWF1dG8tZmxvdzogcm93IH0gLnRiLWltYWdle3Bvc2l0aW9uOnJlbGF0aXZlO3RyYW5zaXRpb246dHJhbnNmb3JtIDAuMjVzIGVhc2V9LndwLWJsb2NrLWltYWdlIC50Yi1pbWFnZS5hbGlnbmNlbnRlcnttYXJnaW4tbGVmdDphdXRvO21hcmdpbi1yaWdodDphdXRvfS50Yi1pbWFnZSBpbWd7bWF4LXdpZHRoOjEwMCU7aGVpZ2h0OmF1dG87d2lkdGg6YXV0bzt0cmFuc2l0aW9uOnRyYW5zZm9ybSAwLjI1cyBlYXNlfS50Yi1pbWFnZSAudGItaW1hZ2UtY2FwdGlvbi1maXQtdG8taW1hZ2V7ZGlzcGxheTp0YWJsZX0udGItaW1hZ2UgLnRiLWltYWdlLWNhcHRpb24tZml0LXRvLWltYWdlIC50Yi1pbWFnZS1jYXB0aW9ue2Rpc3BsYXk6dGFibGUtY2FwdGlvbjtjYXB0aW9uLXNpZGU6Ym90dG9tfSB9IA==
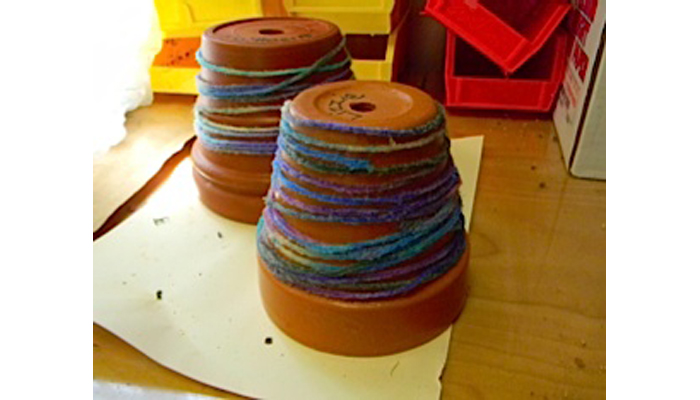
Make Your Own Textured Pot
This post may contain affiliate links; please see our terms of use for details.
There are many opportunities to turn your gardening adventures into craft projects. Here’s a simple and fun way to decorate your pots so they are both pretty and tactually unique!
What You’ll Need
terra cotta pots
yarn (the fluffier the better)
glue
Mod Podge foam brushes (or other brushes you don’t mind getting gluey)
Project Prep
Clean your pot and let it dry completely.
Wrap the yarn around the pot so you can measure how much you’ll need. Cut the yarn to the desired length (plus a little extra just in case).
Poor the glue into a shallow dish (an old jar lid works well) and dip your yarn in the glue. Attach the glue to the pot in any pattern you like (yes, your fingers will get sticky).
Once the yarn is dry, “paint” the outside of the pot with Mod Podge (an easy and inexpensive decoupage paint). This will seal in your yarn and it is also water proof. You can get Mod Podge in a gloss or matte finish (we like gloss for this project).
Let everything dry, then plant your plants in your pretty textured pots!