13 Easy DIY Fine Motor Activities for Preschoolers
This post may contain affiliate links; please see our terms of use for details.
- Fine motor skills are the coordination of small muscle movements that occur in the hands and fingers.
- An occupational therapist can assess your child’s fine motor skills and provide strategies and exercises to help improve them.
- There are many ways to develop and improve fine motor skills, including playing with play dough, threading beads, cutting with scissors, and drawing or painting.
Fine motor skills are the ability to control small muscles in the hands and fingers in order to perform tasks. These skills develop over time, and toddlers typically begin to gain more control of their hands around 18-24 months old.
Many everyday activities require fine motor skills, such as holding a pencil, using scissors, buttoning a shirt, or tying shoelaces. For children with fine motor delays, these simple tasks can be frustrating and challenging.
While many parents are focused on teaching their toddler “Big Life Skills,” like potty training or learning to read, it’s also essential to encourage your child’s fine motor development.
From building blocks to drawing with crayons, toddlers are constantly exploring the world through their hands, and there are many simple activities to encourage fine motor development in preschoolers. Games that require grasping small objects, such as picking up coins or placing pegs in holes, are great fine motor activities. Arts and crafts also provide endless opportunities for exploring different textures and practicing precise movements.
Below are 13 of our favorite fine motor activities for preschoolers that you can set up quickly at home! They each use materials you should have readily available around the house (like cardboard, pipe cleaners, dried pasta, etc.) and can be simple or more complex, depending on your child’s developmental needs. We’ll also show you how to make each of these activities accessible for children who are visually impaired.
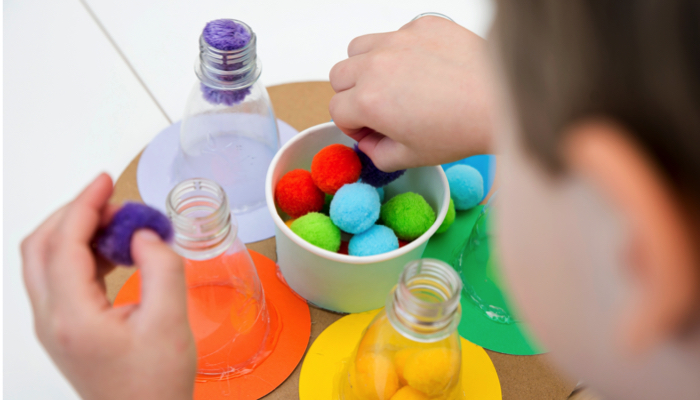
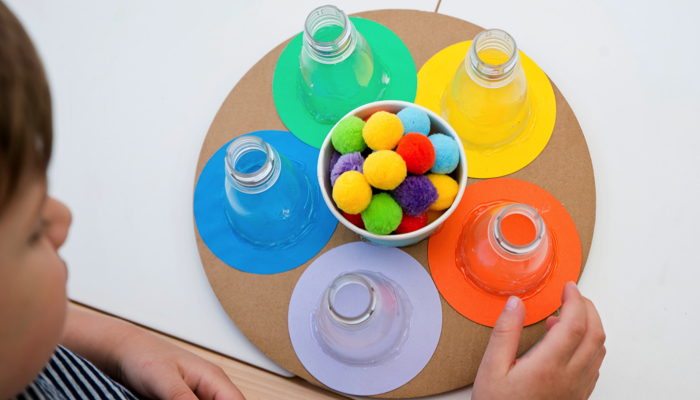
1. Color Match Pom Poms
What You’ll Need
- Cardboard cut into a large circle or a large heavy-duty paper plate
- 5 small water bottles, cut in half
- 5 small construction paper circles cut from different colors
- 1 paper cup
- Different colored pom poms
How To Set It Up
- Begin by gluing a paper cup to the center of your large cardboard circle.
- Glue the colored construction paper circles to the larger cardboard circle around the paper cup and glue the top half of a small water or juice bottle to each colored circle.
- Place multi-colored pom poms in the paper cup, and you are ready to play!
How To Play
The object of this game is to choose one pom pom from the paper cup in the center of the board and place that pom pom in the corresponding bottle with the matching color. Precisely picking up one pom pom requires fine motor control, but even more control is necessary to place the pom pom into the small opening of the bottle.
To make this activity easier, remove the color-matching aspect entirely and use bottles with larger openings. You can even begin with five paper cups in place of the water bottles and just have your child move the pom poms from the center cup to the five outer cups.
How To Make the Game Accessible
For kids who are visually impaired, pick colors they can see and use high contrast. For example, your board could be black and your colored circles bright yellow and bright red. Limit the pom poms to just red and yellow and help your child match the red pom poms to the bottles on the red circles and the yellow pom poms to the bottles on the yellow circles.
You can also replace the color differences with texture differences, like small seashells versus pom poms. Your child could sort the objects by touch rather than by sight.
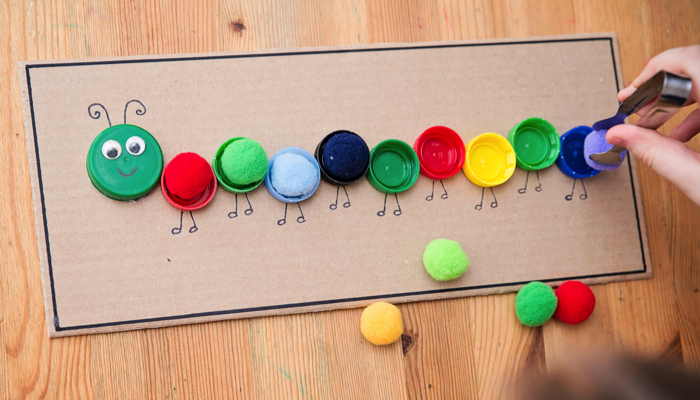
2. Color Match Caterpillar
What You’ll Need
- Cardboard cut into a large rectangle
- 9 small bottle caps in different colors
- 1 large bottle cap
- Googley eye stickers
- Different colored pom poms
How To Set It Up
- Begin by gluing a large bottle cap to the cardboard rectangle to serve as the caterpillar’s head. Glue 9 more small bottle caps for the caterpillar’s body.
- Place googley eye stickers for the eyes and use a pen to draw a mouth, antenna, and legs on your caterpillar.
- Set the pom poms on the table or in a bowl and prepare to play!
How To Play
Have your child sort the pom poms on the table into the matching color bottle cap on the caterpillar’s body. You can make this game more complex and use more hand muscles by offering your child tools to pick up the pom poms, like large plastic tweezers or a large plastic spoon.
How To Make the Game Accessible
Again, use high-contrast colors for kids who are visually impaired (yellow on black works really well for kids with CVI). You can also remove the color matching entirely and just focus on scanning the board to find the bottle caps and place the pom poms in the caps.
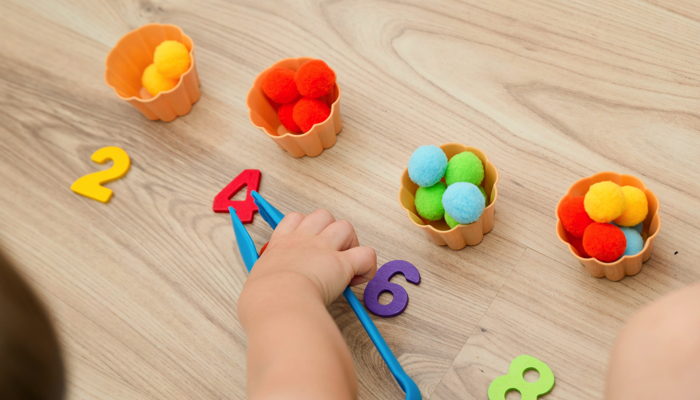
3. Count the Pom Poms
What You’ll Need
- 4 small plastic or paper cups
- 4 foam numbers or numbers written on thick cardboard
- pom poms
How To Set It Up
- For this game, just set a cup next to a number. You can place your numbers in order or make the game a bit more challenging by placing the numbers nonsequentially.
- Set out a pile of pom poms on the table and let the game begin.
How To Play
This fine motor skills activity also focuses on math skills. Your child’s objective is to fill each cup with the number of pom poms determined by the number on the table.
When working on emerging motor skills, just have your child pick up the pom poms and place them in the cups. As they develop stronger fine motor skills, have them use tools to move the pom poms from the table to the cups.
How To Make the Game Accessible
To make this accessible for kids learning braille, cut out cardboard squares, write the number in large print, and add a braille number label. You can glue the paper cup to the cardboard if you don’t want your child to have to scan to find the cup associated with the number.
4. Pasta Straws
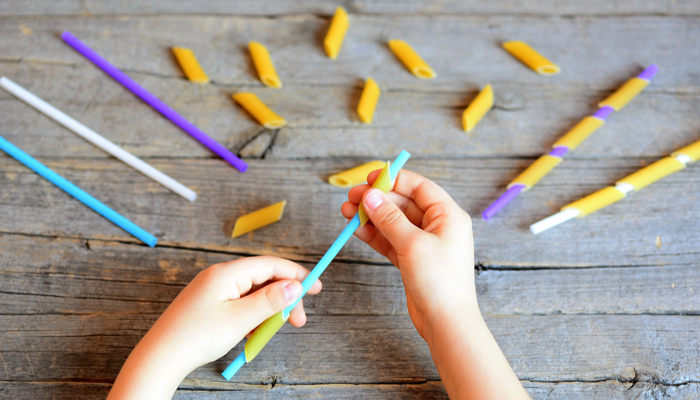
What You’ll Need
- Straws
- Long tube pasta, such as penne or ziti
How To Set It Up
- Not much setup is necessary for this game; just place the straws and pasta on a table and help your child string the pasta on the straws!
How To Play
This is a simple game but can be difficult for little hands to master, and it can take a lot of fine motor practice to get it right. Once your child is comfortable stringing pasta onto a straw, you can complicate the fine motor movements by having them string the pasta onto twine.
Another option is to place the straws in foam (like floral foam blocks) so your child doesn’t need to hold or stabilize the straw in one hand while stringing the pasta with the other (a relatively complex fine motor skill). Depending on the size of your straws, you may be able to place them in the holes of a colander rather than in floral foam.
5. Play Dough Letters

What You’ll Need
- Play dough
- A large printed letter on stock paper
- Small objects to place in the play dough like rolled aluminum foil, bottle caps, paper clips, etc
How To Set It Up
- This is another simple game that doesn’t require too much setup. Print a large capital letter on stock paper. Kids love doing activities with the first letter of their name!
- Set out small objects for your child to decorate the play dough letter with.
How To Play
Help your child form play dough in the shape of the letter using the print as a template. Have them pick up small objects (a simple way to develop fine motor skills) and push them into the play dough. This activity is fun because kids enjoy playing with the first letter of their name and there is no wrong way to decorate a play dough letter!
How To Make the Game Accessible
If your child is learning braille, rather than having them form a print letter out of play dough, have them use small objects (rolled aluminum foil works great for this) to push a braille cell into the play dough. Feel the six dots and see if they can recreate their name in braille in the play dough!
6. Scooping Beans

What You’ll Need
- A small bowl filled with dried beans
- A measuring cup or other cup for scooping
- A 6-cup cupcake pan
How To Set It Up
- This is another simple game that doesn’t require too much setup. Simply place the bowl, beans, measuring cup, and cupcake pan on the table and have your child scoop from the bowl to the pan.
How To Play
Simply have your child move all the beans from the bowl to the cupcake pan. The best part of this game is the sound the beans make as they fall into the pan!
You can make the game more complex by adding other scooping tools, like measuring spoons, or asking your child to fill all the cups in the pan to the same fill line.
How To Make the Game Accessible
Do you know what else comes in sixes? A braille cell! If your child is learning braille, ask them to fill the cups in the cupcake pan to create braille letters!
7. Beads in a Container
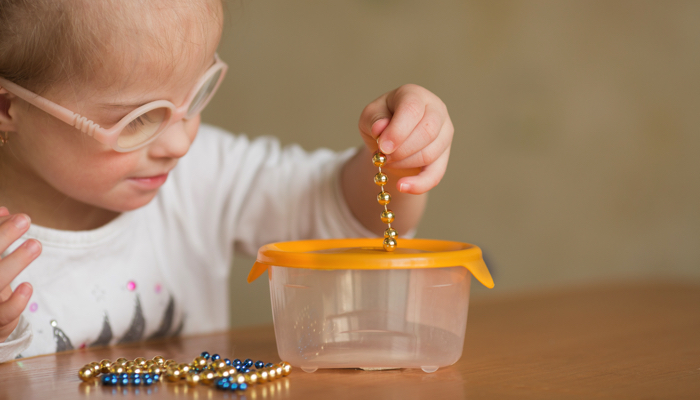
What You’ll Need
- Any plastic container with a hole in the lid
- Party beads cut to length
How To Set It Up
- Start with a plastic container that has a lid. If the lid has a hole in the top, then you are all set! If not, cut a small hole using scissors. Empty Gerber cereal containers work well for this game.
- Cut a length of party beads so they are long rather than hooked like a necklace.
How To Play
Place the party beads in the container with a short length set out through the hole in the lid. Have your child pull the beads out of the container!
Bead necklaces made with smaller beads can be more challenging to hold on to but easier to pull out of the container, while oversized beaded necklaces are easier to hold but harder to pull through. Experiment with both and see which poses more of a challenge for your child.
The great aspect of this game is that your child will have to hold the container with one hand while pulling the beads with the other, also known as bilateral hand coordination. If this is too complex for your child at the moment, you can begin this activity with a container that suctions to the table. As your child works on developing fine motor skills, move to a container that they will have to stabilize themselves.
How To Make the Game Accessible
This game is already pretty accessible for kids who are blind or visually impaired, but one fun add-on may be to play with light-up beads in a darkened room. Kids with light perception will work on their fine motor skills while also working on their visual tracking with bright lights!
8. Toothpick Cactus
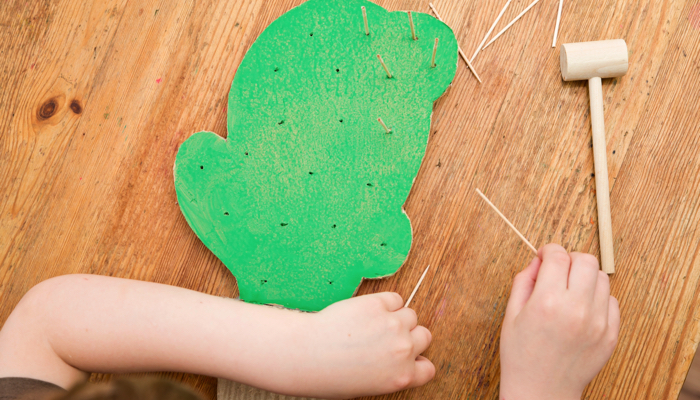
What You’ll Need
- Thick corrugated cardboard
- Green paint or green crayons
- Toothpicks
- Glue
How To Set It Up
- Cut a large piece of corrugated cardboard in the shape of a cactus and another smaller piece in the shape of a pot.
- Paint or color the cactus green and glue the pot to the bottom of the cactus.
- Use a toothpick to poke multiple holes throughout the cactus.
How To Play
Help your child find all the holes in the cactus and place the toothpicks in the holes. Have your child remove the toothpicks and place them back again. Both taking the toothpicks out and placing them back in the holes support fine motor development.
To add complexity to this activity, have your child use a small tool, like a wooden mallet, to pound the toothpicks into place.
How To Make the Game Accessible
For kids with little to no vision, part of the game involves using their hands to scan the cactus and find the holes. For kids with some usable vision, look for colored toothpicks with frills and choose colors that are easy for them to see or that highly contrast the green on the cactus.
9. Drawing Obstacle Boards

What You’ll Need
- Thick card stock or poster board
- Small items like buttons, bottle caps, or popsicle sticks
- Glue
How To Set It Up
- Cut a long rectangular piece of card stock or poster board.
- Glue small items, like buttons, in a pattern on the board.
How To Play
Give your child pens or crayons and tell them to draw a path around the obstacles on the board. This game is similar to a maze, but there is no right or wrong way to “complete” the maze. The point here is to learn how to properly hold and manipulate a writing implement and to create unbroken pencil lines on the paper.
How To Make the Game Accessible
The items glued to the board will be easy for a child with a visual impairment to find, but the pencil lines might not have much meaning. If your child is blind, consider using scented markers or puffy paints to make the lines on the paper.
10. Watermelon Sponge
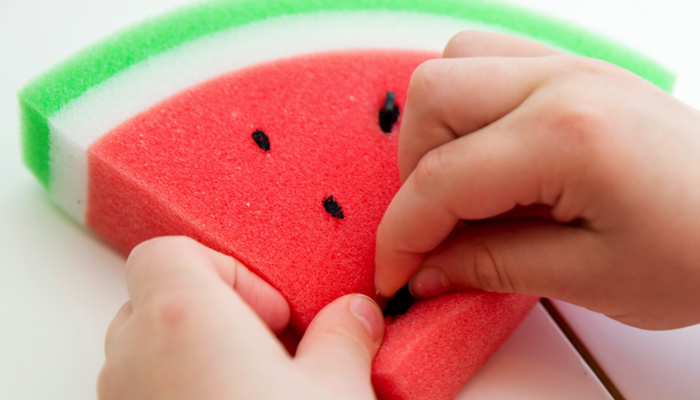
What You’ll Need
- Sponge sheets in white, green, and red
- Glue
- Small black buttons
How To Set It Up
- Cut out sponge shapes and glue them together to build a watermelon. Alternatively, you can purchase a watermelon sponge already assembled!
- Use a knife to slice slits into the sponge where the watermelon seeds should go.
How To Play
The seeds have fallen out of the watermelon, and it’s your child’s job to put them back! Show them how each of the black buttons fits snuggly in the slits in the watermelon sponge to create seeds. Placing the “seeds” in the watermelon is a great fine motor activity, but it’s even more difficult to remove the seeds. Work on both motor skills to develop those hand muscles.
11. Rubber Bands on a Tube

What You’ll Need
- 1 recycled toilet paper or paper towel tube
- Rubber bands
How To Set It Up
- There isn’t much setup required for this activity. Just bring out the tube and the rubber bands, and you’re ready to play!
How To Play
This activity allows for more fine motor practice than you might think! Although relatively simple to set up, the action of holding and stabilizing the tube while placing the rubber bands on the tube is actually a pretty advanced skill. You can make the game more complex by having your preschooler group rubber bands together by color or asking them to count how many rubber bands are on the cardboard tubes.
How To Make the Game Accessible
If your child is blind, try introducing textures to the game! Rather than just using plain rubber bands, collect different types of bands like silicone bands, elastic hair bands, or cotton hair ties. See if your child can differentiate the textures and group the bands together by touch on the tube.
12. Butterfly Decorating
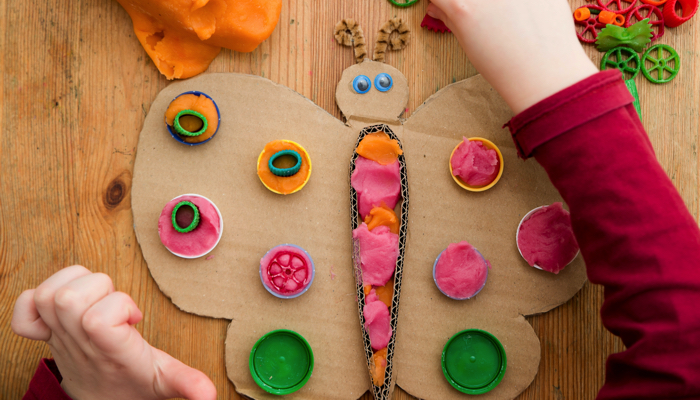
What You’ll Need
- Cardboard
- Googley eye stickers
- Pipe cleaners
- Bottle caps
- Dried pasta
- Glue
How To Set It Up
- Cut out a large piece of cardboard in a butterfly shape and add googley eyes and a pipe cleaner for the antenna.
- You can also cut a thin strip of cardboard and glue that to the center of your butterfly for the body.
- Use glue to paste bottle caps on the wings of your butterfly.
- Set out dried pasta and play dough for decorating. You can add more color by dying the dried pasta. Here is an excellent tutorial on how to dye pasta.
How To Play
This is one of our favorite fine motor skills activities! After you’ve made your cardboard butterfly, your child’s job will be to decorate it with colors and textures. The bottle caps and body can be filled with play dough, and the pasta can be set into the dough to create fun textured designs.
How To Make the Game Accessible
This activity allows for a lot of imagination, making it easily adaptable. Try making a sparkly butterfly with plastic gemstones or glitter foam stickers, or add more textures with sandpaper wings or cut small pieces of paper to create a collage. Collages are also great scissor skills activities that allow for cutting practice, or you can work on tearing paper with your hands instead!
13. Pom Pom Tower
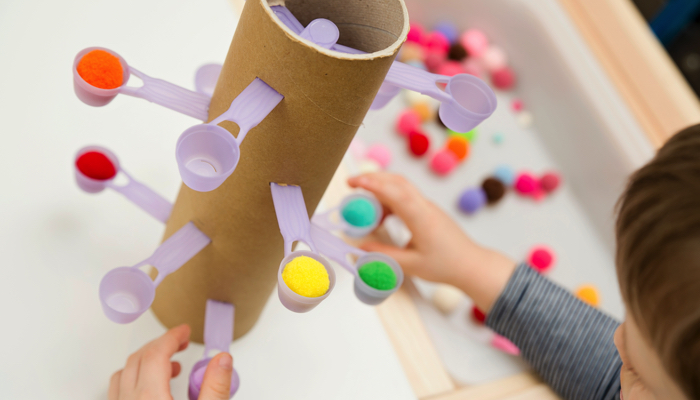
What You’ll Need
- Large cardboard tube (from wrapping paper)
- Plastic measuring spoons
- Pom poms
How To Set It Up
- Cut the wrapping paper tube to your desired height. Thick tubes work best for this activity!
- Use a knife or scissors to create slits throughout the tube. This is where your measuring spoons will go.
- Slide the measuring spoons into the slits in the tube. You’ve made your pom pom tower!
How To Play
Have your toddler place pom poms on each measuring spoon in the tower. They can count the number of pom poms or try to sort the pom poms by color. The biggest challenge for this fine motor activity is to balance the tower while using a pincer grasp to pick up the pom poms and place them in each spoon. Of course, it’s also so much fun to see the tower topple and spill all the pom poms!
How To Make the Game Accessible
This game is fairly accessible as is, but if your child is visually impaired you can focus on helping them scan the tower with their hands to locate all the measuring spoons before beginning play. See if your child can count the number of spoons and keep track of which ones have pom poms and which ones are still empty. This can be a wonderful way to begin learning about scanning and spatial awareness!
Related Posts

Assistive Technology, Orientation and Mobility, Visual Impairment
A New Mobility Technology for Blind Users: Lumen Smart Glasses
Learn about Lumen smart glasses, an innovative assistive technology designed to help blind and visually impaired users navigate safely and independently.

Communication, Visual Impairment
Understanding Tactile Sign Language for Deaf-Blind Children
Tactile sign language allows deaf-blind children to communicate through touch. Multiple forms of tactile sign language can be adapted to meet individual needs.
Development, Special Needs
How to Track Milestones for Developmentally Delayed Babies
Parents of developmentally delayed babies can explore practical tools and strategies to track milestones, celebrate progress, and support their child’s unique developmental journey.