Make Your Own Sensory Play Area for Your Blind Baby
This post may contain affiliate links; please see our terms of use for details.
You’ve probably seen those play gyms for babies that hang toys above your child as she lays on her back. These are great toys that encourage reaching and an understanding of object permanence. But what if you could design your own play area that would stimulate your baby’s senses and make them feel safe and willing to explore at the same time?
You could try building your very own Sensory Play Area. We’ll tell you what it is, how it works, and how to make one. We’ll answer all your questions and take you through the building process step-by-step…
What is a sensory play area?
What is it for?
What do I put in my play area?
How do I make a play area?
Where can I learn more?
Disclaimer: The information provided here is for personal use only. Any building undertaken based on the plans outlined below is done at the builder’s own risk. Please use caution if building a sensory play area for your child.
What is a sensory play area?
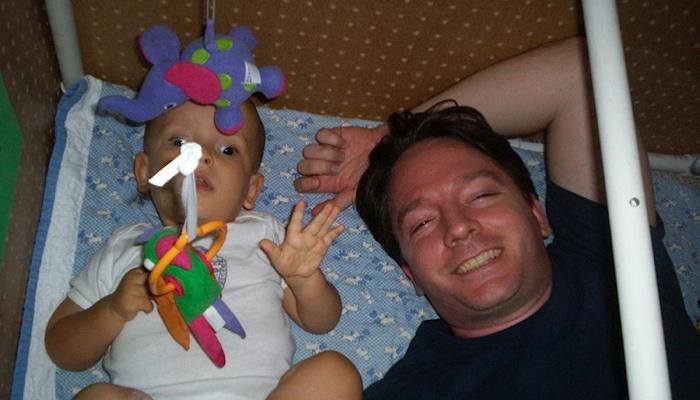
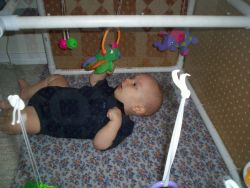 The sensory play area is essentially a large box, often made out of PVC and peg board, in which small objects dangle from the lid so that the baby, when placed in the box on his back, can grab and play with the objects. The main concept is that this is a space where the baby feels comfortable and where he feels that he is in control. The baby can manipulate the toys and other objects and his voice will sound louder and different in the confined space.
The rules to the play area are simple:
- leave baby alone in the play area so he can learn about it himself
- keep the objects in the same place so that your baby will be comfortable and the space will be predictable
- use elastic to hang the objects so your baby can reach for an object, play with it, and then let it return to its position
- you can also attach textured fabrics, other materials, or even lights to the walls of your play area
What is it for?
The sensory play area is designed to…
- encourage reaching
- teach spatial awareness
- improve muscle tone in arms
- encourage vocalization
- teach object permanence
- teach babies that they can manipulate their environment, rather than wait to be manipulated by adults
And the sensory play area really does work! Here is a list of firsts our son Ivan accomplished in his play area…
- first time he vocalized and babbled consistently
- first time he reached for an object after hearing it make a sound
- first time he reached for an object without hearing a sound (he just knew it was there)
- first time he pushed himself up while laying on his belly
- first time he rolled over
- first time he rolled over consecutively
- first time he rolled over with purpose to reach an object (on the other side of the play area)
What do I put in my play area?
Any household objects can work in a sensory play area, from soup spoons to slinkys. Items in the play area should…
- be of pleasure to the baby
- be graspable
- have tactile and auditory qualities
- vary in weight and temperature
- take into account the senses of smell and taste
- be visually inspiring (if your baby has any sight)
- inspire to play counting games
- be changeable in shape
- be comparable
Here are some tips:
- Think beyond simply hanging baby toys in your child’s play area. When you do use toys, don’t just use plastic ones; try hanging a metal slinky next to a plastic one so your baby can compare “alike but different” objects and learn to make his own comparisons. Also, blind babies are sensitive to the different temperatures of plastic vs. metal (warm vs. cold), and they find it interesting to compare the temperatures of both items!
- Leave a little room between the hanging objects so your child doesn’t become overwhelmed.
- A small bottle brush that has been wet slightly is awesome – when your baby touches it or flicks it, a light spritz of water will gently mist him! Eventually, you can put the dangling bottle brush in a small 4oz. babybottle so that he can learn how to put things in and take things out, but don’t forget to keep the brush slightly wet so he gets the misting effect!
- Krinkly gold metallic tissue paper is great fun! Webunch it up and tie elastic to the bunch.
- If your child has light perception, string Christmas lights throughout the play area. Begin playing with the lights off. Then tell your baby that you’re about to turn the lights on and watch their face light up as the twinkly lights fill up the room!
How do I make a play area?
You can make your own sensory play area by following these simple directions…
Click here for a printable material’s list and instructions.
Material’s List:
- 2 pieces peg board, 24″x17.5″
- 1 piece peg board, 36″x17.5″
- 1 piece plexi glass, 36″x24″—with 17 holes drilled through the top, following the diagram below (if you can’t find or can’t afford the plexi glass piece, just use another piece of peg board for the top)
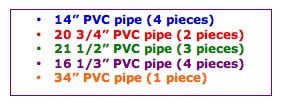
- 3/4″ PVC pipe, cut as follows:
- 4 pieces 14″ pipe
- 2 pieces 20 3/4″ pipe
- 3 pieces 21 1/2″ pipe
- 4 pieces 16 1/3″ pipe
- 1 piece 34″ pipe
- 2 90° PVC elbow socket fittings
- 2 tee PVC socket fittings
- 6 90° PVC side elbow fittings (SxSxS)—this piece is hard to find, you can also use…
- (option) 6 3/4 x 3/4 x 1/2 socket joints attached to 6 1/2 x 3/4 adapters
- cable pulls
- elastic
- household objects and toys
 |
 |
|
| 90° PVC elbow socket fitting | tee PVC socket fitting | 90° PVC side elbow fittings |
 |
 |
| 3/4 x 3/4 x 1/2 socket joint | 1/2 x 3/4 adapter |
Instructions:
- Take your material’s list to the hardware store with you and have them cut all of the pipe to length. Have the plexi glass cut 36″x24″ with rounded corners (for safety) and drilled as follows:
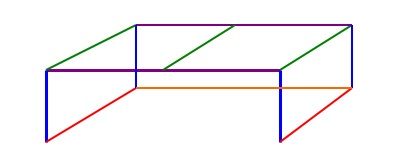
- Using the color-coded diagram below as your guide, attach PVC pipes to make a box. (Here’s a tip: Put a bit of sand in the legs of the PVC to weigh it down so it doesn’t move or slide around the room.)
- Using cable pulls, attach peg board to back, right, and left sides and plexi glass to top.
- Using elastic, attach your toys and objects. You’re done!

Disclaimer: The information provided here is for personal use only. Any building undertaken based on the plans outlined above is done at the builder’s own risk. Please use caution if building a sensory play area for your child.
Where can I learn more?
If you just don’t have the time to make your own play area (and there’s nothing to be ashamed of in that!), then you may want to look at some of these conventional play areas available on Amazon:
- Fisher-Price Music and Lights Deluxe Gym
- Fisher-Price Newborn-to-Toddler Play Gym
- Little Tikes – Lil’ Ocean Explorers 3-in-1 Adventure Course
- Fisher Price My Little SnugaMonkey Kick ‘n Crawl Gym
Read this article in Arabic: قراءة هذا المقال بالعربية
Read this article in Spanish: Lea este articulo en Español
Related Posts

Assistive Technology, Orientation and Mobility, Visual Impairment
A New Mobility Technology for Blind Users: Lumen Smart Glasses
Learn about Lumen smart glasses, an innovative assistive technology designed to help blind and visually impaired users navigate safely and independently.

Braille and Literacy, Music Play, Special Needs, Visual Impairment
Braille needs allies. Music can be one of them.
An inspiring look at how music can support Braille literacy, creativity, and inclusion for blind children.

Tactile Arts and Crafts, Visual Impairment
What Does Art Feel Like? A Guide to Tactile Creativity for Blind Children
Discover how blind children explore art through touch. Learn practical ways to support tactile creativity, build early Braille literacy, and nurture imagination with hands-on projects, textures, and accessible art experiences.